Having access to a mass-storage device on a micro-controller is useful in many scenarios: storing sensor data, logging detailed diagnostic strings at runtime, reading application configuration settings, loading program resources or running assemblies dynamically are common applications for such storage.
In this post, I’ll walk through the steps required to hook up a ‘plain old’ netduino (as opposed to a netduino Plus) to an SD card reader.
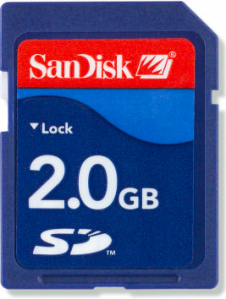
I will assume that you already have an SD card reader and an SD card (4 GB max) at hand. If not, read my previous post on finding parts for your netduino.
Out of the box, a stock netduino with firmware v4.1.0 does not support SD cards so, it will be necessary to upgrade that firmware first: please follow the procedure detailed in this thread in the netduino forums on how to download the firmware and flash the netduino with it.
You can check the version of the firmware at anytime using the “Target\Device Capabilities” menu option in MFDeploy.exe which ships with the Microsoft .NET Micro Framework 4.1 SDK.
Here’s what the configuration of my netduino looks like after flashing it with firmware v4.1.1.0 alpha 2:
 HalSystemInfo.halVersion:              4.1.2821.0

HalSystemInfo.halVendorInfo:            Netduino (4.1.1.0 a2) by Secret Labs LLC

HalSystemInfo.oemCode:                  34

HalSystemInfo.modelCode:                177

HalSystemInfo.skuCode:                  4096

HalSystemInfo.moduleSerialNumber:       00000000000000000000000000000000

HalSystemInfo.systemSerialNumber:       0000000000000000

ClrInfo.clrVersion:                     4.1.2821.0

ClrInfo.clrVendorInfo:                  Netduino (4.1.1.0 a2) by Secret Labs LLC

ClrInfo.targetFrameworkVersion:         4.1.2821.0

SolutionReleaseInfo.solutionVersion:    4.1.1.0

SolutionReleaseInfo.solutionVendorInfo: Netduino (4.1.1.0 a2) by Secret Labs LLC

SoftwareVersion.BuildDate:              Sep 29 2010

SoftwareVersion.CompilerVersion:        400771

FloatingPoint:                          True

SourceLevelDebugging:                   True

ThreadCreateEx:                         True

LCD.Width:                              0

LCD.Height:                             0

LCD.BitsPerPixel:                       0

AppDomains:                             True

ExceptionFilters:                       True

IncrementalDeployment:                  True

SoftReboot:                             False

Profiling:                              False

ProfilingAllocations:                   False

ProfilingCalls:                         False

IsUnknown:                              False
Note: at the time of this writing, alpha 2 is the firmware that you should be using as I discovered the hard way that SD card support is broken in the alpha 3 firmware. Again, check the netduino beta forums for announcements on new firmware releases before re-flashing your micro-controller.
Next, we’ll connect the hardware SPI pins of the netduino to the SD card reader SPI pins like so:
- netduino pin 13 -> SCK pin on the SD card reader
- netduino pin 12 -> MISO pin on the SD card reader
- netduino pin 11 -> MOSI pin on the SD card reader
- netduino pin 10 -> Slave/Chip Select (SSEL) pin on the SD card reader
- netduino 3.3v -> 3.3v pin on the SD card reader
- netduino GND -> GND pin on the SD card reader
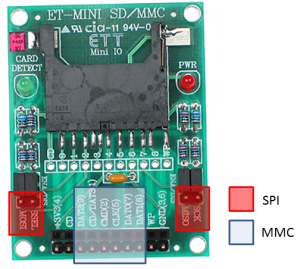
Be sure to check the datasheet for your SD card reader to locate its SPI pins, not to be confused with MMC pins as many SD card readers expose both such as the one I’m using:
Note: in firmware v4.1.1.0 alpha 2, the SD Card Chip Select is hard-coded to digital pin 10. If you are using SPI to communicate with another device already, you will need to use a pin other that digital pin 10 for it. In my case, I was using digital pin 10 to control the latch pin of a shift register which I simply re-assigned to digital pin 8 and updated my code accordingly. It’s that just easy to control multiple SPI devices in parallel 🙂
The netduino firmware supports FAT16 (up to 2 GB max) and FAT 32 formats (up to 4 GB max) so formatting the SD card using your OS of choice should be no problem. However, if you are having trouble formatting your SD cards or if the netduino does not recognize the card’s format, you may want to use a specialized SD formatting tool such as SD Formatter to help resolve these issues.
We’re now ready to read and write data to the SD card from the netduino! You can find a sample code snippet showing how to achieve this in the netduino forums but it is worth a word of explanation:
In your netduino project, you need to add the following:
- Add a reference to the SecretLabs.NETMF.IO.dll assembly which comes with the alpha 3 firmware update. This will expose a StorageDevice class comprised of 2 member functions: MountSD() and Unmount(). The first parameter of the MountSD() call represents the root path of the file system on the SD card. So, all file and directory I/Os that you’ll perform will be relative to that path. For instance, if I mount the SD card with a call like this: StorageDevice.MountSD(“SD”, SPI_Devices.SPI1, Pins.GPIO_PIN_D10); I will subsequently access files on the card like this: FileStream file = new FileStream(@”SD\” + filename, FileMode.Open, FileAccess.Read, FileShare.None);
- Add a reference to System.IO.dll. This will bring in the file, directory, stream manipulation classes required to work with the file system on the SD card.
- Add a “using SecretLabs.NETMF.IO;” at the beginning of your code.
It’s worth mentioning that the MountSD() API is still in flux since the firmware is still in its alpha stages. So, expect bugs and changes to your own code in the future… For example, in the process of testing the current SD card support, I discovered a scenario where digital pin 2 will stop responding properly after a call to Unmount() takes place.
Overall, outside of the caveats that I mentioned, SD card support works well on the netduino and I was able to use it to dynamically load string and bitmap resources for display on an LED matrix.
You can see the results below:
To make things easier on myself, I wrote a ‘SDResourceLoader’ class which takes a simple resource manifest in text format like this:
bitmap:name=spaceinvaders.bmp.bin;width=32;height=8

bitmap:name=c64-computer.bmp.bin;width=256;height=16

string:name=hi;value=Hello!

string:name=gameover;value=Game Over!
The bitmap resources and the manifest are stored at the root of the SD card:
12/20/2010  11:37 PM               175 resources.txt

12/20/2010  05:18 PM               512 c64-computer.bmp.bin

12/20/2010  05:18 PM                32 spaceinvaders.bmp.bin

3 File(s)            719 bytes
The ‘SDResourceLoader’ class parses the manifest and instantiates the corresponding objects that I use later on in the application like this:
public static void Main()

{

var SDResourceLoader rsc = new SDResourceLoader();
var C64Font = new CharSet();
 var Invaders = (Bitmap) rsc.Bitmaps["spaceinvaders.bmp.bin"];

var Hi = (Bitmap) C64Font.StringToBitmap((string) rsc.Strings["hi"]);

var Gameover = (Bitmap) C64Font.StringToBitmap((string) rsc.Strings["gameover"]);
var matrix = new LedMS88SR74HC595().Initialize();
 while (true)

{

Scroll(ref Hi, ref matrix);

Scroll(ref Invaders, ref matrix);

Scroll(ref Gameover, ref matrix);

}

}
The .bmp.bin files were produced using the 1BitBmpToHex project located here which was updated to create a raw binary file with the bitmap data along with the hex codes.
The complete ‘HelloNetduino’ project with SD card support is located here.
Happy hacking!
PS: As of 01/01/2011, firmware version 4.1.1 alpha 4 is available and contains bug fixes for the digital pin 2 issue and includes improved I2C support. Also, to build a release version of SecretLabs.NETMF.IO.dll, check this thread.

Hi there, I just wanted to say I found this post very useful. I’m currently starting my own project and am intending to use an SD Card for datalogging. Your write-up was very clear, and very well laid-out. Excellent job! Thanks for posting.
Hi Richard,
You’re welcome and I’m glad you found the post useful 🙂
Cheers,
-Fabien.
Hi Fabien,
Can I use the same methods for MMC cards? Is netduino driver able to read micro MMC card?
Thanks,
Istvan
Yes, you can. Just use the proper MMC pins on the reader instead.