In 1986, when the Chernobyl disaster happened, I was living in France. The whole country was scared of the fallout resulting from the radioactive cloud travelling over Europe. The French government downplayed the impact of the nuclear accident on the country, manipulated the media and was less than forthcoming about the amount of radiation that we were absorbing. Not cool. Fast forward to 2011: I now live in Seattle, 4792 miles away from Japan. On March 11th, the Fukushima nuclear accident happens, bringing back many memories from 1986: would the government lie again about the gravity of the situation? Could we trust the data that the EPA is publishing about radiation levels in Washington state? I was determined to find out for myself and started looking for parts to build a Geiger counter.
Integrating a Geiger counter with a netduino
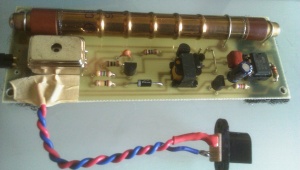
I eventually discovered that Electronic Goldmine was selling a bare bone radiation detection kit at a decent price. At a time when everyone else on the web was sold out of Geiger counters, this was perfect!
I just needed to figure out a way to count the pulses coming from the sensor. The solution that I came up with was simple: the kit features an LED which flashes whenever a pulse is detected by the Geiger-Mueller tube. If I could read each pulse and generate an interrupt from it, it would be easy to count them.
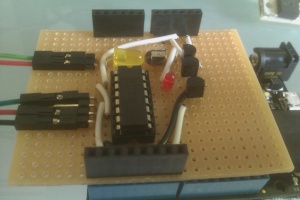
Based on that idea, I built an opto-coupler circuit using parts that I had on hand: 1 photodiode, 3 NPN transistors (2N2222) and 2 LEDs.
When the photodiode detects the light emitted by the yellow LED connected to the Geiger sensor, it energizes the base of the first NPN transistor which in turn amplifies the current and saturates the base of the 2nd transistor to flash the red LED. The base of the 2nd transistor is also connected to the base of the 3rd one, which drives an InterruptPort to ground on the netduino, resulting in a pulse-counting interrupt handler to be called in the application:
            _geigerCounter = new InterruptPort(
                interruptPin,
                true,
                Port.ResistorMode.PullUp,
                Port.InterruptMode.InterruptEdgeLevelLow);
_geigerCounter.OnInterrupt += PulseCounter;
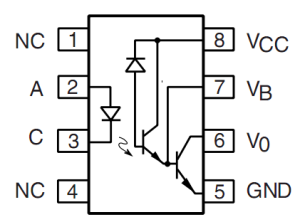
This effectively reproduces the function of an opto-coupler like this one, even though my version is much ‘noisier’ than Vishay’s component.
NOTE: The benefit of this method of communication between the two devices is that they’re electrically isolated from each other: the Geiger-Mueller tube requires ~450 volts to function, which would instantly destroy the netduino+ if somehow the two circuits were connected together by mistake. You obviously need to be careful while working with such high voltages or you could get hurt even if the current is low.
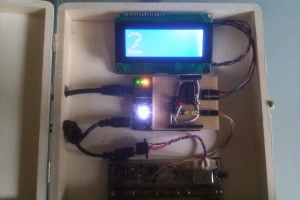
The second part of the circuit consist of a NXP HEF4050 level-shifter used to drive a 5 volt LCD screen through a serial backpack. Everything fits on a DIY shield piggybacking the netduino+:
In addition to counting pulses, the interrupt handler uses the time intervals between pulse pairs to generate a random stream of bits, using a 32 bit integer as the ‘window’ on the bit stream. This will be handy should you require more randomness in your life 😉 This random number generation method is based on John Walker’s excellent article about how his HotBits system works.
            if (_ticksCount < _ticks.Length) {
                _ticks[_ticksCount++] = time.Ticks;
            } else {
                _ticksCount = 0;
                _flipper ^= true;

                var Interval1 = _ticks[1] - _ticks[0];
                var Interval2 = _ticks[3] - _ticks[2];

                if (Interval1 != Interval2) {
                    _randomNumber <<= 1;
                    if (_flipper) {
                        _randomNumber |= (Interval1 < Interval2) ? 0 : 1;
                    } else {
                        _randomNumber |= (Interval1 > Interval2) ? 0 : 1;
                    }
                }
            }
Connecting to Twitter
Every so often, the application reports data to Twitter:
To achieve this simply, I used Matt Isenhower’s MicroTweet library, which I modified to make it more resilient to networking issues and OutOfMemory exceptions.
I included my changes in a private build which I provided with the source code of this application. Hopefully, this will only be temporary as Matt’s already working on improving MicroTweet.
The configuration of the application is done by reading a set of parameters from a file on the netduino+ microSD card like this:
* NTP Server list: http://tf.nist.gov/tf-cgi/servers.cgi
string:name=ntpServers;value=nist1-lv.ustiming.org,time-nw.nist.gov,nist1.aol-ca.symmetricom.com,nist1.symmetricom.com,nist1-sj.ustiming.org,nist1-la.ustiming.org,time.nist.gov,utcnist.colorado.edu,utcnist2.colorado.edu,ntp-nist.ldsbc.edu
*
* Register your application @ http://dev.twitter.com/
* To obtain your tokens and secrets check the 'Application details' page and copy them below
*
string:name=accessToken;value=???
string:name=accessTokenSecret;value=???
string:name=consumerKey;value=???
string:name=consumerSecret;value=???
*
* Geiger counter location GPS coordinates
*
string:name=latitude;value=47.6741667
string:name=longitude;value=-122.1202778
To make parsing such configuration files easy, the netduino Helpers library provides a generic resource loader:
        private static void InitializeResources() {
            var resourceLoader = new SDResourceLoader();

            resourceLoader.Load();

            _ntpServers = (string)resourceLoader.Strings["ntpServers"];
            _latitude = (string)resourceLoader.Strings["latitude"];
            _longitude = (string)resourceLoader.Strings["longitude"];

            _twitter = new TwitterClient(
                            (string)resourceLoader.Strings["consumerKey"],
                            (string)resourceLoader.Strings["consumerSecret"],
                            (string)resourceLoader.Strings["accessToken"],
                            (string)resourceLoader.Strings["accessTokenSecret"]);

            resourceLoader.Dispose();

            Debug.GC(true);
        }
The enclosure
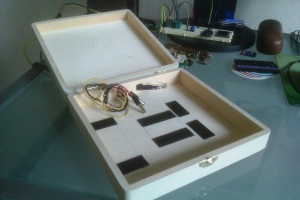
The box I selected for this project is made of a thin, light wood perfect for painting and decorating. The bottom part of the case being so thin precludes using standoffs and screws to secure the electronics. The approach I took was to use sticky Velcro strips instead which worked really well: all the parts stay firmly in their place, yet they’re easy to remove from the case if needed:
The final touch to the case was the Fallout 3 theme, courtesy of the artwork shared by Bethesda for Fallout New Vegas. If you’re a gamer, you will likely be familiar with the Fallout universe, where your character’s survival depends on a wearable computer, the PIP Boy 3000, which features a Geiger counter. Being a huge Fallout fan, I felt compelled to pay homage to the game with this project 🙂
Conclusion
When comparing the data samples from this project to the data produced by the EPA’s air radiation monitoring stations in the area, the averages are aligned for the most part, which makes me feel better about the transparency and the integrity of our local government.
Action shot
Links:
- Make Magazine How-To article
- CrunchGear article
- Channel 9 “Netduino is RAD” article




Good job, Fabien.
I think the tube is a bit pricey and I would see something more about the brand-new geiger sensor from Seeedstudio also.
http://www.seeedstudio.com/depot/j408947-geiger%C2%96m%C3%BCller-tube-p-834.html?cPath=144_194&zenid=3c94baebfaa8ea31a15ffe4594070219
The usefulness of a similar toy is not only limited at the moment, just after the disaster. Unfortunately the radiations will travel on goods and thousands of other ways also: I’d like to have such a toy even in my house.
No-comment about the opportunity to build nuclear power-plants and/or getting energy from them.
Cheers
Thanks for sharing this link Mario 🙂 Seedstudio seems to have added this to their product line recently.
That Seedstudio GM tube is cheap indeed! Although, it only appears to be sensitive to Gamma rays and is less precise than the Russian tube I’m currently using. I’ll keep it in mind if I decide to build another one.
Cheers,
-Fabien.
Awesome. Great Job!
I think I’ll try this as a fun project.